Category Archives: 3D Printing

Planning the upgrade, or creating a monster

The Gecko was running for a bit, but I’m going to make some changes to it.  The Z axis is messed up, and slips once you try to move about 50mm above the bed.

I’ve been following the different Voron builds lately, and I really like the gantry support used in the Voron 2.4 – using linear rails, steppers and belts at each corner.  I also like the electronics arrangement – particularly the DIN rails to mount everything to.

I would also like to build a Voron 0.1 – the small size is amazing, as well as the speed.  I first saw it on the CNC Kitchen youtube channel.

So here’s my initial checklist:

  • modify the existing gantry of the Gecko to use the Z drive approach of the Voron 2.4.
  • I like the Voron 0.8 approach to the electronics – mounting them at the back of the printer.  Would be so much easier to work on, rather than flipping the printer over.
  • replace the Lerdge S board with a BigTreeTech Octopus.
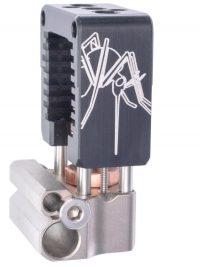
  • I want to move away from the E3D Titan extruder, and will see if I can use the Afterburner or StealthBurner tool end designs with the current Gecko gantry.  Ultimately I may just end up building a new gantry as well, and just convert the Gecko completely to a Voron instead of a Geckostein 🙂

I’ve set up an Ender 3 v2, and for the most part, it is stock.  I did pick up an upgrade bundle from Amazon, and also a Micro Swiss all metal hotend from RepRapWarehouse.

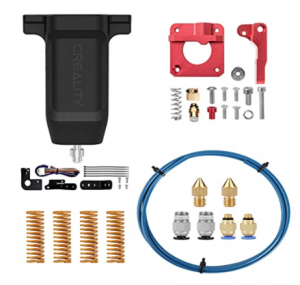
However, I’ve only installed the CR-Touch (and updated the firmware), and the bed spring upgrades –  and I’ve been very happy with the prints – PLA, PETG, and ABS – very impressive for such an inexpensive printer!  I’ll hold off with the rest of the upgrades until stuff actually fails. When that happens, I think I might also switch to the Micro Swiss direct extruder as well – but we’ll see!

The Gecko goes on…

My printer has been idle for a number of months and this past weekend I finally spent a little time fixing up some wiring and actually printed a coffee grinder funnel prototype I started working on. The initial print was great – but after making some changes and starting another print job, I almost immediately ran into issues with blockages in the hotend.

I upgraded the machine with a genuine E3D Titan extruder and V6 hotend, but I’m still not impressed with their performance. Need something better – but what?

Update 🙂 I think I have a plan…

Mosquito hotend by Slice Engineering

Came across a company called Slice Engineering in the U.S.A., that has developed a hotend they are calling the Mosquito. The design is very intriguing, and it looks like it might be 1/2 of the answer I’m searching for.


Bondtech BMG-M Extruder

The other half of the answer is the extruder, and a Swedish company called BondTech has an extruder designed for the Mosquito – the BMG-M. I like the dual gear mechanism they’re using, and from what I’ve read, is a good step up from the Titan.

Gecko Upgrades

I received the East 3D Gecko upgrade kit, last fall, and recently I had finally gotten around to tearing down the printer and installing it.  In the process, I also installed some RGB lighting, ceramic heat bed, and the Lerdge power-off module kit as well.

The upgrade kit changes the gantry suspension so that it hangs from 4 points, instead of the original 2 points. It also changes the XY gantry, providing a new rail to make things much easier to square up.

I ended up removing the power-off module after it resulted in a blown fuse in the ac input switch – thankfully the blown fuse protected the main board and power supply.

The ceramic bed is a much flatter printing surface – and is supposed to provide much better print adhesion.  In practice, I find it works really well, provide that you have the surface perfectly clean and levelled from the start.  If either of these things aren’t perfect, you end up with a spaghetti print!

One of the other upgrades I did previously was replacing the stock hotend and extruder with original E3D components.

My Gecko

Well, it’s been a while since my last post.  The Gecko printer arrived, and I had a lot of fun putting it together.  There were a couple spots that I had some challenges with, but the support received from the Gecko designer, Chay Chen, was outstanding – and I’ve had all sorts of fun printing some random objects, some upgrade components for the printer, and some useful objects too!

This is just temporary insulation and lighting – it works for now, and helps with the ABS print jobs!

One of the useful things I’ve printed so far – portafilter holders for my espresso machine!

Another useful print job – I designed this fan mount. The new fans make this printer much quieter!

I’ve made a few upgrades/mods:

  1. Replaced clone hotend/extrudere with genuine E3D Titan extruder, and E3DV6 hotend
  2. Added 2 80mm Noctura fans to replace the 40mm mainboard fan
  3. Lerdge dual extruder daughterboard
  4. Lerdge PC/USB module
  5. 5m of RGB LED light strip
  6. Logitech C270 web cam
  7. Raspberry Pi 3
  8. DS18B20 temperature sensor
  9. Power module

The printer made quite a noise when powered up due to the 40mm mainboard fan mounted behind a bunch of perforations in the front panel of the printer. I added the Noctura fans on the right side of the panel below the print bed – one blowing across the mainboard (I think this orientation is actually better for cooling the stepper drivers), and the other across the heatbed MOSFET (had no heating issues, but figured it can’t hurt!) I designed some custom fan holder/clips to attach them to the panel below the printing platform.
I’m currently using the dual extruder daughterboard to drive the RGB LED light strips.  The PC/USB module allows me to connect the printer to the Raspberry Pi, which is running OctoPi (a Raspberry Pi disk image pre-configured with OctoPrint software), and I’ve added the temperature probe (which required a little soldering – adding a resistor and connectors to plug into the GPIO pins on the Raspberry), and also the web cam, connected via USB.
With the OctoPrint software running a couple additional plugins (OctoPrint-Enclosure, and OctoPrint-Anywhere).  I added a DS18B20 temperature sensor to the Raspberry Pi, and using OctoPrint-Enclosure, display the ambient temperature in my printer. OctoPrint-Anywhere allows me to connect remotely from anywhere to see what the printer is up to, and I have an app on my iPhone that allows me to see the current print job status, and even initiate print jobs, or stop them if I see a problem.
The power module hasn’t been wired up yet.  I’m holding off since finding out that the Gecko designer has actually made a number of improvements to the printer design, and is sending out a substantial upgrade kit at no additional cost!  After I receive the upgrade kit, I plan on installing the module while installing the upgrade.  After that’s all done, I’m going to design an insulated enclosure for the printer.
This printer has been a lot of fun – and I’m truly amazed at the support from the East 3D and all of Chay Chen’s team there, and also the wealth of knowledge of other Gecko owners on the Facebook group – East 3D Gecko 3D Printers CoreXY. For anyone interested in getting this great printer, you can order it on Aliexpress.
Now I have to ramp up my CAD skills!  Have been using a Google’s SketchUp so far, and dabbling with Autodesk Fusion 360.  I think I’m going to take a course soon – never too old to stop learning! 😀