Easy Vegetarian Bean Burger
a quick, easy, and most importantly - tasty bean burger
Ingredients
- 2 cans mixed beans I used Compliments brand, 6 bean mix. Drained, rinsed and pat dry
- 3/4 cup rolled quick oats quick couple pulses in vitamix
- 2 each avocado remove pits and mash
- 3 tsp chipotle powder
- 1 tsp cumin grind in mortar & pestle
- 1 tsp sea salt
- 1/2 tsp ground black pepper
- 1 each egg beaten if using - omit if you want vegan burger patties
- 2 tbsp olive oil
- 2 tbsp vegetable oil
- 6 each hamburger buns
- 1 cup mayonnaise (use a vegan one if that is your preference)
- 1 each Blazin Chipotle bbq sauce use as a condiment in burger
- 1 each large beefsteak tomato thickly sliced
- 1 head butter lettuce rinse and dry leaves
- 6 slices cheddar cheese optional
- 1/2 each red onion thinly sliced
Instructions
-
Preheat oven to 325 degrees Fahrenheit.
-
Spread beans out onto baking sheet, and dry for 5 minutes or so at mid level of oven. Let cool down for another 5 minutes or so.
-
pulse rolled oats a couple times in Vitamix, and add 2 tsp chipotle powder, ground cumin, salt, pepper.
-
In a large bowl, add beans, oat & spice mixture, 1/4 of the mashed avocado, the olive oil, and beaten egg, and mash & mix with a fork until mixture comes together.
-
Divide and form into 6 patties about 4-5" in diameter, and about 1" thick.
-
Heat skillet, and add vegetable oil. Once it just starts to lightly smoke, add patties and fry for about 3-5 minutes on each side. Should have a golden crispy surface.
-
While frying, add sliced burger buns to baking sheet and lightly toast in over (should still be at 325 degrees) - perhaps 4 minutes.
-
Mix remaining mashed avocado, mayonnaise, 1 tsp chipotle powder and mix well.
-
Prepare toasted bun by applying avocado mayo mixture to bottom, red onion, add bean burger, cheese, tomato (salt & pepper if you like), lettuce. Add some Blazin Chipotle bbq sauce to bun top, and enjoy!


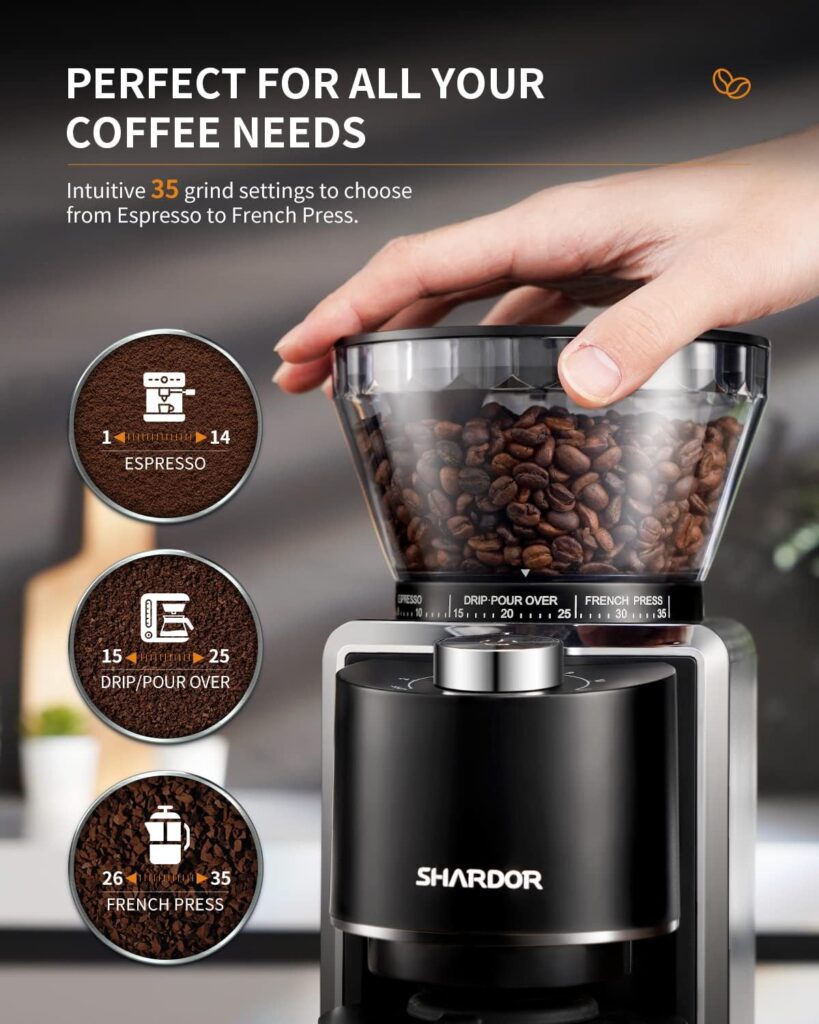
 It was only $79, and a $10 coupon was available on top of that! There are a couple even less expensive ones, but I liked the grind adjustment setting, and the fact this model specifically includes mention of being anti-static.


 A couple times we ran into issues – one week they didn’t deliver until a couple days later, and another time they had omitted the primary ingredient (no salmon for a salmon chowder). Both times their customer service was very responsive and resolved the issues to our satisfaction.
 The meals come with a letter sized card that details what ingredients the meal includes (and qty), and step by step instructions for the preparation. The cards are great – we save them (and save the repeats for family and friends). I find them useful for meal ideas without a kit. The one thing that can be a challenge is finding the appropriate spice blends they use in most of their meals. These are often the ‘magic’ that makes their meals. The do provide ingredient lists and recipes for many of their blends (but not all)
  The meals are packed in a medium sized box with each meal individually packed in it’s own recyclable or biodegradable bag. A third insulated bag contains a well sealed ice block along with any perishable ingredients from either of the meals.